Amazon F C Barnes the Sun Will Shine Again
How to Restore Plastic Headlights
The ultimate guide to Headlight Restoration without using Clear Glaze. This video volition show you how to restore your oxidized plastic headlights and so they will never fade, xanthous, fog, or turn hazy again!
Other youtube videos practise not piece of work! To restore your headlight permanently you should use this method. You will just be wasting your time and effort using issues spray, toothpaste, or blistering soda. And y'all volition finish up ruining your headlamp if you lot op to put a clear coat on them. This is the simply right mode to restore your headlamps despite all the other so-chosen permanent fixes.
Things you will need to restore your headlights
500 grit sandpaper: http://amzn.to/2GD0rLM
800 grit sandpaper: http://amzn.to/2plunnl
3000 grit sandpaper: http://amzn.to/2FKEoWk
Lens and Hard plastic cleaner: http://amzn.to/2HGUY5M
Lens smoothen and protector: http://amzn.to/2plv3cn
3m headlamp restoration kit for businesses: http://amzn.to/2DzNeAe We charge 125$ per vehicle and this kit has paid itself off many times over.
How to Restore Headlights
The ultimate headlight restoration video in this video, I'll testify you how to restore your headlights to like-new condition using a
three step procedure with sandpaper and polish.
Be sure to spotter the cease of the video considering there are some tips you lot're not going to desire to miss I volition go along your
headlights looking like new for the lifetime of your vehicle.
To get the oxidation off these headlights nosotros're going to be using three different grits of sandpaper to sand downwards whatsoever oxidation we're gonna start with a 500 grit.
I'k gonna be using a DA simply to speed up the process that just velcro's on this power sander we're gonna become from 500 to 800 grit and then to a final smooth with a 3,000 grit sandpaper.
Any sandpaper volition work it doesn't accept to exist these circular discs with the velcro. You lot can also do this past mitt it works. Just too
I've done it both ways.
I've done this process several times. When nosotros're done I'1000 gonna use a lens and hard plastic cleaner to buff out the headlight and so I'm going to utilize a lens and polished protector
Protecting around The Headlight
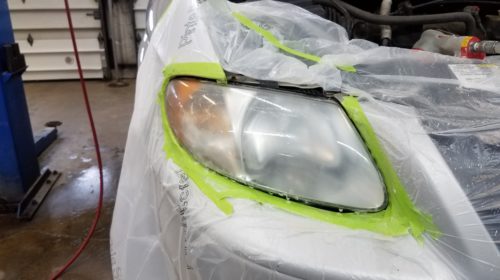
I'm gonna start past taping out the surface area just to protect any paint from the sandpaper
these headlights
I'm simply gonna lay plastic over the top of these headlights and and then I'm going to take a razor blade and I'one thousand gonna cut on top of the tape that way you don't cut into the paint. One time we get around the headlight cutout I'm just going to take more masking tape and take the plastic down
Sanding The Headlights With Sandpaper
Alright, and then we're gonna first with a 500 grit sandpaper. Y'all tin practice this by paw or with a power sander. I have an air sander here that I'chiliad using, 3m Palm Sander
And have some water we're gonna want to exercise this all wet sanding. It just helps go on the sandpaper clear or final long and it cuts into the plastic a little ameliorate.
And so we're merely gonna get over this thoroughly with a 500 grit sandpaper until yous're sure y'all have all the area covered evenly. As you lot exercise this you can see all the oxidation lifting off of the headlights. Then nosotros're gonna motion on to the 800 grit sandpaper and do the same procedure. So from 800 grit we're gonna go on to the 3000 grit and you're probably gonna want to spend the most fourth dimension on the 3000 dust cuz this ensures yous get all the scratches out from the 500 and the 800 grit sandpaper out of the headlights. It's gonna ensure a nice smooth end.
Basically, all this sanding is doing is only removing that top layer of oxidation all that brume headlight hazing yous know the fogging in the headlights. All the sanding is gonna get rid of all that out of that top plastic layer?
How to Polishing the Headlights
At present before we start polishing nosotros're simply gonna wipe them dry with a rag or some paper towel. Now that we got the headlight all dry we're gonna apply the lens and smooth protector.
If you use the 3000 grit long plenty it really makes for less work when it comes to buffing them out.
This is where they really come to life and even with these headlights not beingness that bad
you can still see there's a huge difference.
Superior Headlight Restoration Method
This headlight restoration method is far superior to any other headlight restoration method out there. I've tried all of them, toothpaste and all that stuff are simply a agglomeration of gimmicks. In club to get these headlights back to original, yous're gonna have to sand off all that oxidation and as you can run across we concluded upwards with some pretty amazing result for results hither.
Something you're definitely non gonna practice is use toothpaste or some of the other then-chosen headlight restoration methods out in that location.
This is a pretty permanent fix if you proceed headlight UV protector on them. Opposed to putting a articulate coat on your headlight something yous definitely don't want to do that to articulate coat is gonna impede the actual the functionality of the headlights
I've seen other YouTube videos where they sand them downwardly and I'm spraying with clear glaze highly not recommended
The right way to fix oxidized Plastic headlights
This is the right way to set up oxidized Plastic headlights. This is the ultimate
headlight restoration method and everyone can practise it with a three-step procedure of sandpaper and polish, and that'southward it and this is the results you go.
More Headlight Restoration tips from a unlike perspective
At that place are valid arguments against clear coat but the arguments presented hither don't stack upwards. At the end of this comment, I'll propose what appears to be the best solution I've seen.
Firstly, if your headlights are skilful, never use a solvent or abrasive on them or yous'll remove the protective factory blanket and observe yourself looking at these kinds of videos. This includes problems spray, other oils, toothpaste, cutting/buffing polish, etc.
The headlights are coated in a UV protective layer in the factory. This is a specialized solution that absorbs into the polycarbonate surface in combination with heat handling. It is not a clear glaze. Using a solvent or abrasive on your headlights will compromise this protective coating.
If your lights accept gone murky or yellow then the factory protection is already compromised and thus you lot need to take activity. You lot could buy new lights or try something else. Once at this point, there is a valid argument of "what have I got to lose?" to try something else. But, there is a lot of very bad advice out there which I'd like to accost here.
Like most DIY solutions proposed on this topic, this video is but half the job. Once yous take prepared the headlight equally shown in this video, you must protect the headlight from UV with a permanent bulwark, non merely a temporary one using a smoothen like that shown here. The problem with relying on smooth UV protection is that you need to continually maintain it. Where I live that means polishing my lights every two months because our sun is exceedingly harsh. This simply isn't realistic and I take better things to do. My car lives exterior which doesn't help matters either. (One day I'll have space for a car in my garage… but non today.)
A good UV protected clear coat specifically designed for a polycarbonate surface could exist a reasonably good solution after sanding and and so buffing the headlight every bit demonstrated in this video. The massive mistake I consistently meet is the failure to remove any protector or wax contained in the buffing compound before the clear coat application. This is painting 101 and even so consistently absent from almost instructional videos. However, does such a clear coat exist? The chemical formula of a clear glaze could dissolve or weaken the headlight. Information technology besides expands and contracts at a different rate than the headlight that can lead to long term damage. Simply, if a articulate coat exists specifically designed for this purpose so it'south presumably a valid option.
The mutual arguments against clear coats are by and large two-fold: It interferes with the light refraction and tin be more difficult to deal with in the future.
The light refraction statement seems completely absurd. Headlights are non a precisely focused beam. They're not a light amplification by stimulated emission of radiation. Their purpose is to spread calorie-free around so you can come across around you. Although a clear coat will marginally alter (refract) the output on a different bending, this will be pragmatically immeasurable, merely assuming it does affect the angle, just recoup past adjusting your headlight tilt. But, is the refraction amending from clear glaze worse than a murky headlight? What about water? Water volition refract the light considerably. Should we avoid using headlights in the rain? BTW, the shine/wax, etc contained in your automobile wash will likewise influence the light refraction. This argument, which I've heard earlier, isn't valid.
Another argument is "Clearcoat will peel and can be hard to bargain with in the futurity". Well, perchance. If done right, I don't run into why it wouldn't last 5+ years. Peeling is probably common with poor quality clear coats that are non UV protected ('indoor-merely') but the big reason is a poorly prepared surface (wax and grease not removed). I'd rather sand off the clear coat that 'might' require attention every five+ years than polish my headlights every few months.
There seems to be an orange peel statement floating around. I don't consider this a peculiarly good argument because I dubiousness it will have much bearing on the operation of the lights. I accept that it might expect a chip crap but it nonetheless looks better than a murky UV damaged the light. Notwithstanding, orange skin means you lot haven't finished the paint chore. If you do a job bad enough to become orangish skin, then set up it i.eastward. finish the paint job. To say "don't clear glaze due to orange skin effect" is to say "don't use this solution considering you might only do half the job".
Many people have suggested a UV stable 2K paint. I cannot attest to the suitability of this but 2K paints contain some nasty compounds necessitating the demand for protective gear. If 2K contains isocyanates like I suspect information technology does, then the protective gear is essential. Yous'll see a lot of youtube clips with people proverb, 'use a mask'. This unqualified and typically casual off-hand statement is irresponsible. You must use a 'suitable' mask that is rated for that type of contaminant, which ways charcoal filtered mask 'at a minimum' but ensure fifty-fifty that is rated for the task. Additionally, use eye protection. Non just condom goggles, but 'sealed' eye protection equally these nasty chemicals are absorbed through your eyes. A full-face up mask is another choice instead of a split mask and goggles.
But, having said all of that, the estrus stretchable UV protective moving picture seems like the winner to me. This film is usually used to 'tint' headlights and taillights but it does come up in clear. Ready the headlights as shown in this video, and then apply the UV protective film that applies much like window tint film. This film should last many years without any maintenance and tin can be easily removed in the hereafter. It appears to give you lot the advantage of a clear coat without the expertise necessary or disadvantages of a articulate coat. Aye, the film will also accept a refraction index to information technology… probably worse than articulate coat.. simply even so much less than h2o, and of an corporeality that is still irrelevant.
Headlight Restoration DIY Training And Protection That Will Terminal "Upwardly-Dated Method"
Headlight Restoration DIY Training And Protection That Will Last OK Similar the title says be talking nearly Headlight Restoration DIY Training And Protection That Will Last
I'm going to bust all the headlight restoration myths in this video and explicate what actually works to keep your headlights looking similar new for years to come up if your headlights take become hazy oxidized and starting to yellow this is the video for y'all.
Due to all the misinformation out there plus all the feedback I take gotten on the headlight restoration video I did over a twelvemonth ago. I have come to a method anybody can hold with and if yous know of better headlight restoration and protection practices be sure to comment below with what works for you.
Products in this video:
**Nano-glass-ceramic coating designed specifically for polycarbonate headlight https://amzn.to/2O3qCR5
Mother's aluminum polishes https://amzn.to/330ZBSo
Wipe on Headlight protectant https://amzn.to/2s1M3JJ
Headlight polish/ 3m hard plastic cleaner https://amzn.to/32XNPYV
Spray Clear Glaze https://amzn.to/2px70v1
Headlight restoration sandpaper kit https://amzn.to/2Kz2wv5
**3m Headlight restoration kit https://amzn.to/2O1iD6N
Clear vinyl protectant https://amzn.to/340ouiA
**Meguiars headlight restoration kit https://amzn.to/37ot107
WD-40 https://amzn.to/2r9UYbm
Toothpaste https://amzn.to/32VvM5O
I will also be referring to it a lot in this video because the training method will
exist the same and definitely the all-time manner hands down to prepare your UV damaged headlights. Were a lot of the controversy comes in is when it comes to how you should protect your freshly restored
plastic headlight
And there are many dissimilar ways, all with there advantages and disadvantages also as the toll and fourth dimension and skill it will take. I will be answering all
questions in this video.
Depending on the condition of your headlights, conditions information technology just is some light fading
or some very bad oxidation and yellowing
Or maybe the factory clear code is starting to bit from the headlight lens.
This volition determine how y'all should go nigh restoring your headlight.
If the factory protectant layer is however intact I would just recommend a lite smooth with a 3000 dust sandpaper and a low-cal compound I like to employ from 3m
Subscribe to my youtube channel hither: https://goo.gl/j1pCfn
For the nigh mutual automotive fixes to the nearly mutual machine and truck bug. DIY auto repair to help you save coin.
Source: https://flatratemechanic.com/index.php/2018/03/17/how-to-restore-headlights-permanently-do-not-use-clear-coat/